


I’ve been an Adobe Lightroom user fanatic since I first bought the software in 2011. For those not familiar with it, Lightroom is software for cataloging and editing digital images. In 2014, the Adobe team introduced Lightroom Mobile for Lightroom CC (the Adobe Creative Cloud version of Lightroom). When it first came out, I wasn’t too interested in Lightroom Mobile, because I just couldn’t see myself working on a tiny screen when I am used to a big desktop monitor. But last year, I got an Android tablet, and I thought I’d give Lightroom Mobile a try. I loved it, so I thought I’d do a little tutorial on getting started with it.
Lightroom Mobile is available for free as a standalone app for culling and editing photos taken or loaded directly on your mobile device, but this tutorial is geared toward using Lightroom Mobile with the Adobe CC subscription to work with images sync’d from the Lightroom catalog on your computer.
Setting up Lightroom Mobile
Desktop Setup
Lightroom Mobile is super easy to set up. The first step is to make sure that you have the Lightroom mobile sync feature turned on. To do that, click on the “Identity Plate” in the top-left of your Lightroom screen (by default it says Adobe Lightroom CC, or it can be personalized). From there, select “Getting started with Lightroom Mobile” and login with your Adobe ID. If you’ve already logged in for Lightroom Mobile in the past, just make sure Sync with Lightroom Mobile doesn’t say “Paused” (if it’s enabled, it will instead show two little lines like a pause button). Note that you can only enable Lightroom mobile on one catalog at a time. This is one of the reasons I generally recommend using only one Lightroom catalog.
The software automatically syncs collections from your Lightroom catalog to the Adobe Cloud, so there’s no need to copy or export catalogs or anything like that. When you create a collection that you want to access on Lightroom Mobile, just check the “Sync with Lightroom mobile” box. If you want to sync a collection that you’ve already created, you can just right-click the collection and select “Sync with Lightroom mobile” or click the little box to the left of the collection name in the left panel. This will generate a Smart Preview of your image and then sync that Smart Preview to the cloud. There is no limit on the number of images you can sync, and it does not count against your Adobe CC file storage limit.
Mobile Device Setup
The next step is to install the Lightroom app on your mobile device from the App Store (Apple) or Google Play store (Android). Log in with your Adobe ID. Once you start sync’ing from your computer, it will take a little while to upload Smart Previews of your images to the Adobe Cloud, and then a little while longer for your mobile device to “see” all the image. How long this takes depends on how many images you sync and the speed of your Internet connection. I recommend configuring the app to sync over WiFi only so you don’t use up your plan’s data allotment. You can install Lightroom Mobile on your phone in addition to (or instead of) a tablet, but photos are obviously easier to see on a larger screen.
Using Lightroom Mobile
Lightroom Mobile on Devices
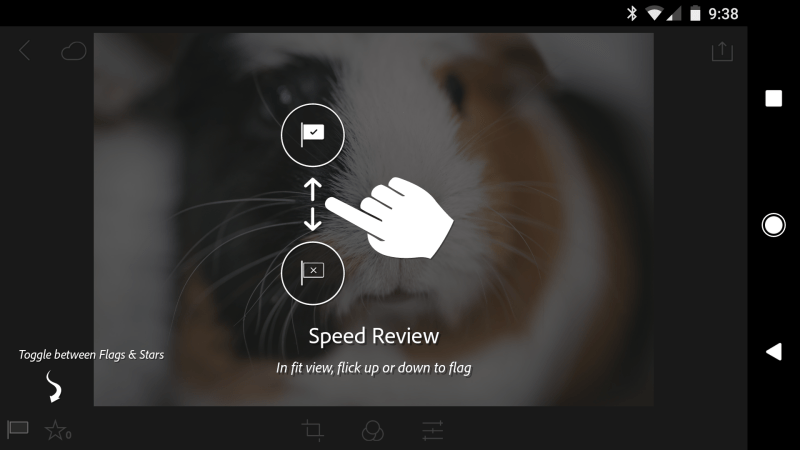
Once your mobile device sees all the images you’ve sync’d, you can view them in thumbnails or full-size images, by collection or by date. You can also filter by flag or rating, and sort by capture time, modified date, file name, or custom order. I find the biggest benefit in the ease at which I can cull through a large number of images. Once sync’d, you can cull your images without any Internet access, and your changes will sync once you are back on WiFi. Use your fingers to swipe right or left to browse through the photos, and then swipe up to flag the photo as a pick or swipe down to flag an image as rejected. (You can swipe up or down to scroll through all three flags if you change your mind.) You can also press the star icon in the bottom left corner to use the up/down swipe to set the star rating for the image. Use a two-finger tap to show exposure settings and other info, and two-finger tap again to show the histogram.
You can also do a fair bit of editing with Lightroom Mobile, and the Adobe team just keeps adding more editing functionality. Normally, editing can only be done over WiFi, so that Adobe can access the image data from the cloud. However, you can press the three dots next to a collection name on your app to enable Offline Editing. This will take up significant space on your device, so should only be used sparingly. When you are back on WiFi, all of your edits will sync to the cloud and back to your Lightroom catalog. The editing tools include cropping, Adobe presets (not your own presets), and sliders to replicate the Basic panel, the tone curve panel, HSL panel, and the split toning panel, as well as the effects tools for Post-crop Vignette, Lens Correction, and the Dehaze slider. The iOS version also includes the ability to make selective edits using a radial or linear selection tool.

Lightroom Mobile on the Web
You can also access your sync’d images on the web by going to https://lightroom.adobe.com and logging in with your Adobe ID. This is useful if you want to quickly cull or edit from a laptop or another computer besides the one where Lightroom is installed. There are some keyboard shortcuts I use to quickly cull images on Lightroom mobile, much like the gestures on the mobile app.
- Use the right and left arrow keys to scroll through images.
- Type P to flag the photo as a pick or type X to flag the image as rejected. (Type U to remove the flag.)
- Quickly star the images with the 0-5 keys.
- Press I to display the Info panel with exposure settings and other basic EXIF data.
- Type D to open the editing tools, which include cropping, some Adobe presets (not your own presets), and sliders that match several of the editing tools in the Lightroom app.
The editing sliders replicate the Basic panel, the HSL panel, and the split toning panel, as well as the effects tools for Post-crop Vignette, adding Grain, and the Dehaze slider.

Lightroom Mobile for Cell Phone Photos
You can also take photos on your mobile device with the Lightroom Mobile app, or import images taken with other camera apps into Lightroom Mobile on your device. You can configure the Lightroom Mobile app to Auto Add any new photos on your device if you want all your mobile photos to be imported into Lightroom Mobile.
If you are setup for Lightroom Mobile sync, mobile images taken in or added to Lightroom Mobile will appear in your Lightroom catalog, where you can organize or edit them further. This is a great way to get your mobile pictures off your device and onto your computer and automatically imported into your Lightroom catalog. In your Lightroom preferences on your computer, you can specify a folder location where you want these images saved and they will appear there. Otherwise, Lightroom will save them to a default location on your drive, and they will appear under the name of the device in the Folders panel in the Lightroom Library view.
My Experience with Lightroom Mobile
When I first tried Lightroom Mobile, I created a few collections in Lightroom on my computer with photos from some recent trips I had taken. I’m an overshooter and I get overwhelmed when I come home from vacation with 1000+ photos, so those images tend to sit on my computer after a trip. The first night I setup and used Lightroom Mobile, I managed to quickly cull through hundreds of pictures from the comfort of my couch before I went to bed. It just seemed so much less like work when all it required was some quick swiping! It also encouraged me to quickly make a decision instead of zooming in and pixel peeping like I tend to do on my computer, and I wasn’t distracted with trying to edit pictures as I culled. Of course, you can edit and crop as well from the app pretty easily, but I found the culling speed to be the real magic of this tool. When I got back to my computer the next morning, my changes had sync’d so I had a lot less unflagged pictures from our travels. I have since used Lightroom Mobile many times on my phone and tablet to cull images, and I have used my laptop to access Lightroom Mobile on the web to cull and even make a first pass at editing some of my photos. It’s very freeing to not be limited to working at my desk, and I think I work more quickly from the mobile app or the web site because I’m able to stay more focused on culling and I don’t get bogged down in pixel peeping and editing. I feel like with Lightroom Mobile, I may actually be able to finally get through my huge backlog of personal images!
I’d love to hear if you’re using Lightroom Mobile and whether you’ve found it helpful or not. Leave a comment and share your experience or any additional tips you have. I have just scratched the surface so far, but it has already saved me so much time that I’m head over heels for it!
I hope you enjoyed this Tech Tip Tuesday! Comment below to let me know what you think, or if you have any questions about this or other topics you’d like me to cover in the future. Or contact me about my consulting services if you need more one-on-one advice.
My name is Kelley, and I am the owner of Kelley K Photography, a portrait photography business based in Smyrna, Georgia. I have been a member of the Click Pro network of photographers since 2016. In addition to photography, I have 20 years of experience in the IT industry, including consulting, technical writing, web design and hosting. I publish occasional Tech Tips on my blog, Instagram, and Facebook, as well as offering mentoring to photographers on technical issues relating to photography, from Lightroom to web hosting.


Leave a Reply